This swing dress is very easy to make yet very cute and comfy.
To make this dress you will need 64” wide fabric. The fabric can be knit or non-knit as long as it drapes well.


Pattern
You will see 3 numbers in every measurement. The top one is Size Small or Size 4-6; next is Size M or Size 8-10; the bottom one is Size L or Size 12-14. You will use the number of your size.
We will start with the Back Piece.
1. Draw a vertical line and separate it into 3 parts according to the lengths marked.

This line will be the middle or your back piece.
2. Draw the horizontal lines. These lines are references to shoulder, chest, waist and the bottom of the dress

3. Now, we have the body of the back piece. Next will be neck and shoulder.

Your will need to use a french curve ruler to draw the neckline. If you don't have one, that's OK. Here is a printable french curve ruler. http://thesewingnotebook.blogspot.com/2013/02/printable-patternmaking-tools.html
4. With the french curve ruler, we will do the next part of the pattern, the armhole.

After connecting the line from shoulder to chest, divide the line into 3 equal parts. From the dividing points draw 2 perpendicular lines as marked to form the depth of the armhole. Finally, use your french curve ruler to connect the dots to form an armhole.
5. This step is the easiest. Connect the lines from chest to waist to the bottom. The back piece is finished.

Let's continue on to Front Piece.
1. Just like the back piece, we'll draw a vertical line, the center of the front piece.


To form a neckline, draw a reference line from shoulder to where the bottom of the neck we want. Then, at the middle of the line draw an 1" perpendicular line to mark the depth of the neckline. Use a french curve ruler to connect the dots to finish.
4. We will finish with the armhole and sides.


Just like the back piece, to form an armhole, we draw a line from shoulder to chest and divide it into 3 equal parts, then draw 2 perpendicular lines as references to the depth of the armhole. Finish it with a french curve ruler to connect the dots.
Sleeve
Now we have front and back pieces. We can make the sleeve pattern. In order to make a sleeve pattern, we will need to measure the armholes of the front and back patterns we just made.
1. We will draw a cross with the marked measurements.

I didn't mark the measurement of the horizontal line because it's determined by the lengths of armholes.
2. The measurement of the front armhole will be the slope on the right. The back armhole will be on the left.

3. We have a rough shape of a sleeve. Next step will be adding the the curves to form the top of a sleeve.
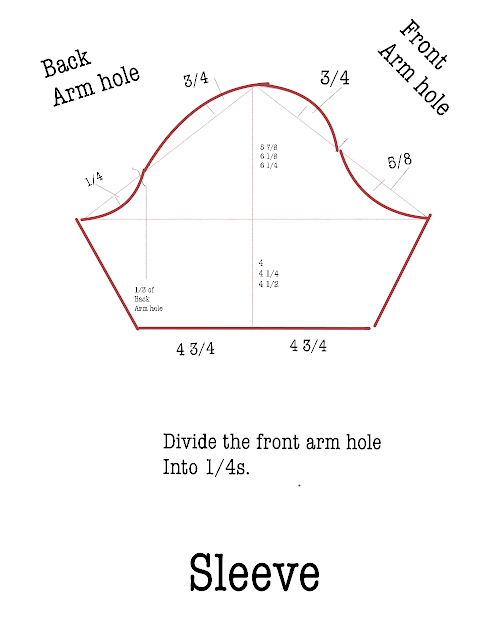
We will start with dividing the front armhole lines into 1/4s. At the end of the first quarter, we'll raise 3/4" out, and dip 5/8" in at the end of the 3rd quarter. Use a french curve ruler to form the curves as shown in the picture.
The back piece is a little different. From the top of the sleeve to where you want to form the outward curve is 1/4 of the front armhole. You will raise the curve here by 3/4". At the end of the line about 1/6 of the back armhole is where you dip in 1/4". Just connect the dots to form a curve like the one in my picture.
The last part is the bottom of the sleeve. The numbers of this part in the picture are my measurement. You have to measure your own arms to get the right number for you.
Neck piece
I cut bias tape to bind the neck. If you are using knit fabric, you can make a crew neck.
Cut
If you are going to sew with a serger, you will leave 1/4" seam all over except the bottoms of sleeves and the shirt. The seam of the bottoms will be 1".
If you are using a non-knit fabric, you will need a wider seam. I think 1/2" seam will do. The seams of the bottom of the dress and sleeves are the same, 1".
Sewing
This is how I put the pieces together.
connect shoulder-->bind the neckline-->install sleeves-->close the sleeve and the sides-->hem the bottom and sleeves.
You might have different approaches. As long as it gets the job done, it's a good way to sew.
If you are using knit fabric, here is a link on how to install T-shirt neck piece.
https://www.youtube.com/watch?v=Jw2XZcTtjJc

Happy sewing!
No comments:
Post a Comment